Posts

Showing posts from April, 2017

Angular: An Introduction

Angular is an open source javascript framework. The moto of the team is to make web development effortless. Angular follows the mobile first approach. Features of Angular: Cross Platform Build modern websites which look like apps (Progressive web apps) Build native web apps using Ionic, React etc Desktop installed applications Speed and Performance Angular turns the templates to highly optimized code for today's generation of Javascript virtual machine. Users can load only the code required to render the view they request You can serve view on node.js, PHP, .NET etc Productivity Quick development with powerful yet simple template syntax Command line tools Testing is easier Advantages: If the application is heavy, Angular keeps it fully UI responsive Uses dependency injection to maintain code without writing lengthy code Uses Component based approach Disadvantages: Will take time to learn if you are new to Angular 2 Useful link:  Angular Index

Filter for your Servlet

Image
Filter is used to perform filtering tasks on the request or the response or both. It is an interface in the javax.servlet package. Filters can be used for the following purposes: 1) Authentication Filters  2) Logging and Auditing Filters  3) Image conversion Filters  4) Data compression Filters  5) Encryption Filters  6) Tokenizing Filters  7) Filters that trigger resource access events  8) XSL/T filters  9) Mime-type chain Filter  Filters have the following three methods: Simple example of using filter for pre and post processing of response. This is how my project looks like: MyFilter will be applied before and after our MyServlet. Here is the code: index.html <!DOCTYPE html> <html> <head> <meta charset="ISO-8859-1" > <title> Insert title here </title> </head> <body> Welcome! </body> </html> web.xml <web-app> <servlet> <servlet-name> mySe

Login Logout and Cookies!

Image
Another example of using Cookies for session management in Servlet. Here let us see how to login, maintain user session and then logout. Our application has the following main pages: 1. Login page 2. Logout page 3. My Profile 4. Index page The only criteria : You should be not able to logout or view my profile when you have not logged in. Let us see the code, you can take a look at the project structure from my previous post on Your own Cookie! . index.html file : Simple html page which displays the login, logout and profile links with Welcome. 1 2 3 4 5 6 7 8 9 10 11 12 13 14 15 16 <! DOCTYPE html > < html > < head > < meta charset = "ISO-8859-1" > < title > Insert title here </ title > </ head > < body > Welcome ! < a href = "login.html" > Login </ a > < a href = "logoutServlet" > Logout </ a > < a href = "profileServlet" > Prof

Your own Cookie!

Image
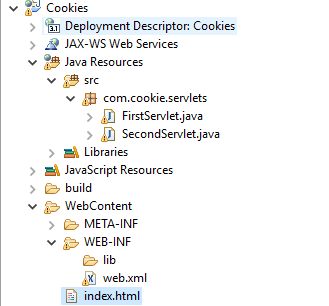
In this post we will see how to create a simple web app which uses cookies to hold the user data (remember, in http ever request is a new request and cookie is a way to store the user data for subsequent requests to the server). Refer  Cookies in Servlet  for information about cookies Setup tomcat on your machine. (I have used apache-tomcat-8.0.15) I am using eclipse for installation. Create a dynamic web project, Cookies My final project structure looks like this: How to deploy our war file in tomcat. Export project -> as WAR file -> save it as Cookies in the webapps folder of tomcat. Start tomcat using startup.bat in bin folder. Access http://localhost:8080/Cookies/ Create an index.html file: <form action="servlet1" method="post"> Name : <input type="text" name="name"> <input type="submit" value="Go"> </form> Create FirstServlet.java class. package

Cookies in Servlets

Image
Cookies are small piece of information used for session management. The Http protocol is a stateless protocol, it means that each request is a new request for the Http server. Cookies is one of the ways in which Http server can persist data between multiple client requests. Let me depict it with the help of an image: When the browser sends a Http request for the first time, the servlet associates a cookie with the response and sends it to the browser. Now every subsequent request will be associated with the cookie and the server will use this information to identify the user and process the data accordingly. There are two types of cookies: 1. Persistent Cookie -> It is available for a single session only. Once the user closes the browser the cookie is removed. 2. Non-persistent Cookie -> It is available for multiple sessions. Cookie is removed only when the user logs out. Advantages of using Cookies: 1. The information is stored on the client side. 2. Simple