Posts

Showing posts from 2017

Angular - Good to know facts for developers

Setup angular app Setup  here No restarting your application while development. npm start This command runs the Typescript compiler in "watch mode" - ie any changes you make to your code will automatically get reflected in the browser. Your code will get launched and when changes are made, the browser will refresh and display your changes. Manage dependencies using npm Simply manage all your angular and angular app dependencies using npm - node package manager. node.js and npm are essentials for angular development, get them if you dont already have them. Separate devdependencies and dependencies With Angular you can have separate development dependencies and separate deployment dependencies. You no longer need to worry about packaging you dev dependencies. angular-in-memory-web-api It is an angular-supported library. You don't need an actual server or real HTTP calls. You can simulate the behavior using this library. bootstrap A pop
Your own Thread Pool

"Create your own thread pool" - A typical interview question, asked to check if you have a basic understanding of Thread Pool, Runnable, and the disadvantages of creating a new Thread for each Task. ThreadPool is made up of a number of threads, identified by the core thread pool size. Once you start the ThreadPool, all the threads start running, waiting for the task. Each task or Runnable that you submit to the ThreadPool is executed by the existing threads of the ThreadPool. Creating a thread is expensive, so it is advisable to have a ThreadPool which manages the tasks. Here is a program which creates its own ThreadPool - MyThreadPool. import java.util.concurrent.ArrayBlockingQueue ; import java.util.concurrent.BlockingQueue ; class MyThreadPool { private int corePoolSize ; private MyThread tPool []; private BlockingQueue < Runnable > queue = new ArrayBlockingQueue <>(1024); public MyThreadPool ( int corePoolSize ) { thi

Ejabberd Client Guide

In this post, we are going to look at a quick guide to build a client for Ejabberd Server. I have used Smack API . Other available APIs can be found here . Here you have links for web based, python, c++ etc client etc. Please note this post just gives you pointers to move ahead in your development. Before we start with the example, let us first understand what XMPP protocol is. XMPP stands for e X tended M essaging and P resence P rotocol. It is a open standard, decentralized, secure extensible, flexible and diverse protocol for messaging and presence. XMPP Message looks like this: <message to= 'romeo@example.net' from= 'juliet@example.com/balcony' type= 'chat' xml:lang= 'en' > <body> Wherefore art thou, Romeo? </body> </message> It is based on XML. It enables near real time exchange of structured yet extensible data between any two or more network entities. Originally named Jabber, it was

Different ways to create an Object in Java

In this post, we will discuss the different ways to create a new Object Consider we have a class, say CustomClass and we are going to see different ways in which we can create a new object of CustomClass. Using new keyword/the constructor: new CustomClass (); Clone You already have an object and you using Cloning to create a copy of that object CustomClass myObject = new CustomClass (); CustomClassobject = ( CustomClass ) myObject . clone (); Class.forName: The reflection API gives us the ability to create objects without calling the constructor. Spring and Hibernate use reflection to create objects. Class . forname ( CustomClass ); Deserialization is another way of creating the object. First you serialize and then deserialize to get the object.

Address Book - Part 5 ( CSS Styling our Angular app )

Image
In the previous post , our contact list looked like this: Looks very mundane. Let us beautify our Address Book. CSS styling is the way to go!  There are different ways to add styling to our angular app. Make changes in the style.css file in the src folder. This will be applied across the entire app ie global. Adding the style tag to the specific component ..... @ Component({ selector : 'contacts' , templateUrl : './contacts.html' , styles : [ ` .contactList { padding: 0 ; } .contactList li{ list - style - type: none ; padding: 0.25em ; width: 15em ; cursor: pointer ; background - color: lightblue ; color: navy ; border: 0.01em solid lightgrey; border - radius: 0.2em ; text - align: left ; margin: 0.5em ; } .contactList li: hover { background - color: dodgerblue ! important; color: white ; } .contactList li.selected: hover { background - color: yellow ; } ` ] }) export class Con

Address Book - Part 4 ( Multiple Components and use of @Input)

Image
Let us continue from where we left in the previous post . In this post we will Make our address book project modular. Having Input to our components Our app.component.ts is doing everything, it is holding all the data displaying all the components. If  in future, we have to add a few more features to the address book module, chances are the entire file will become a mess. (Here we need to note that atleast our contact.html is a different file, having it in the same class would reduce code readability) In Step 1 , we will convert our existing code into a modular code. We will create a contact.ts class, which will hold the class Contact. export class Contact { name : String ; contactNumber : Number ; address : String ; } Next, we will create a contact.dummy.ts which will hold the dummy data of the Contacts. import { Contact } from './contact' ; export var DUMMY_CONTACTS : Contact [] = [{ name : "Jon Snow" , cont

Address Book - Part 3 (ngFor, ngIf and click)

Image
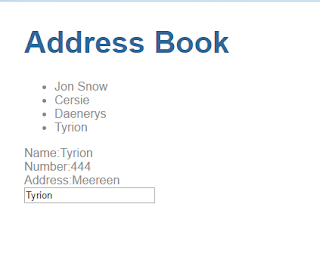
In continuation with the previous post . We will add the following features to our address book Multiple contacts Click on a contact on get contact information In order to have multiple contacts, we need to store them in an array . Next to display all the contact names, we need a loop which will iterate over the contacts and display contact information( ngFor directive). The app.component.ts will have an array of contacts: 1 2 3 4 5 6 7 8 9 10 11 12 13 14 15 16 17 18 19 20 21 22 23 24 25 26 27 28 29 30 31 32 33 34 35 36 37 38 39 40 41 import { Component } from '@angular/core' ; class Contact { name : String ; contactNumber : Number ; address : String ; } @ Component({ selector : 'my-app' , templateUrl : './contacts.html' }) export class AppComponent { title = "Address Book" ; contacts : Contact [] = [{ name : "Jon Snow" , contactNumber : 111 , address : &quo

Address Book - Part 2

Image
A step further of the previous post . In this post we will Save our html in another file Create a data structure to hold contact data Our datastructure for contacts should hold the following information for now: name number address Make the following changes in our application app.component.ts -> 1 2 3 4 5 6 7 8 9 10 11 12 13 14 15 16 17 18 19 20 21 22 23 24 25 import { Component } from '@angular/core' ; class Contact { name : String ; contactNumber : Number ; address : String ; } @ Component({ selector : 'my-app' , templateUrl : './contacts.html' }) export class AppComponent { title = "Address Book" ; contact : Contact = { name : "Jon Snow" , contactNumber : 111 , address : "North" }; } Line 4 gives a new datastructure to hold contact information. Line 14 tells that the view is in the html file. Create a new file contact

Address Book - Part 1

Image
We will go forward with the previous project structure , and build a simple address book. Note: We can have our npm server running throughout our development (using npm start ), any code changes will be reflected immediately. Creating the address book will be a step by step procedure. Let us start by displaying the name and the phone number of the contact. Let us provide the provision to edit the number of the contact. Our final product, at the end of this post, will be: Any changes in the text box should immediately be reflected in the text below. Lets get started. Make the following changes in app.component.ts import { Component } from '@angular/core' ; @ Component({ selector : 'my-app' , template : ` < h1 > Address Book < /h1> < label > Name :< /label> {{name}} < br > < label > Contact :< /label> <input [(ngModel)]="contact"> < br > {{name}} , {{contact}} ` }) ex

Angular: step up and Set up your Environment

Image
Lets get started with the angular development environment setup. Note: I have npm (3.8.6 version), node (6.0.0 version) installed on my machine. Install npm on your machine I have downloaded the sample application from the official angular site: Setup Downloaded and unzipped the app in the setup folder. Run npm install from command promt. You can ignore the warning, your final project structure will look like this: Now run npm start from command promt. Let us check the importance of each file in this project: Filename Description package.json It contains the metadata for the npm project. This helps npm to identify the project as well as provide the project dependencies. src/app/app.component.ts Defines the AppComponent along with an HTML template, CSS stylesheet, and a unit test. It is the root component of what will become a tree of nested components as the application evolves. src/app/app.module.ts Defines AppModule, the root module that tell

Angular Index

Angular: An Introduction Angular: step up and Set up your environment Address Book - Part 1 Address Book - Part 2 If and For Address Book - Part 4 ( Multiple Components and use of @Input) Address Book - Part 5 ( CSS Styling our Angular app ) Developer Facts for Angular

Angular: An Introduction

Angular is an open source javascript framework. The moto of the team is to make web development effortless. Angular follows the mobile first approach. Features of Angular: Cross Platform Build modern websites which look like apps (Progressive web apps) Build native web apps using Ionic, React etc Desktop installed applications Speed and Performance Angular turns the templates to highly optimized code for today's generation of Javascript virtual machine. Users can load only the code required to render the view they request You can serve view on node.js, PHP, .NET etc Productivity Quick development with powerful yet simple template syntax Command line tools Testing is easier Advantages: If the application is heavy, Angular keeps it fully UI responsive Uses dependency injection to maintain code without writing lengthy code Uses Component based approach Disadvantages: Will take time to learn if you are new to Angular 2 Useful link:  Angular Index

Filter for your Servlet

Image
Filter is used to perform filtering tasks on the request or the response or both. It is an interface in the javax.servlet package. Filters can be used for the following purposes: 1) Authentication Filters  2) Logging and Auditing Filters  3) Image conversion Filters  4) Data compression Filters  5) Encryption Filters  6) Tokenizing Filters  7) Filters that trigger resource access events  8) XSL/T filters  9) Mime-type chain Filter  Filters have the following three methods: Simple example of using filter for pre and post processing of response. This is how my project looks like: MyFilter will be applied before and after our MyServlet. Here is the code: index.html <!DOCTYPE html> <html> <head> <meta charset="ISO-8859-1" > <title> Insert title here </title> </head> <body> Welcome! </body> </html> web.xml <web-app> <servlet> <servlet-name> mySe